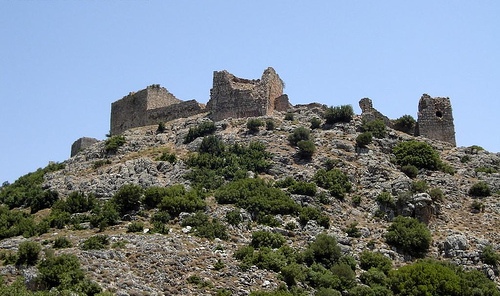
Location: 25 km from Jeser Alshghur Map
Found: 11th century
Bourzey Castle (also known as Mirza Castle, Qalaat Mirza, Qalaat
Burzey, or Qalaat Barziyeh; Arabic: قلعة ميرزا or قلعة برزية) is a
dramatic hilltop fortress in northwestern Syria, perched on a rocky
crag in the Jebel Ansariyeh (coastal mountains) at the edge of the
Ghab Plain and Orontes River Valley. It lies about 25 km from Jisr
al-Shughur in the Shathah Subdistrict (Hama Governorate area), at
roughly 450 m elevation, with coordinates around 35°39′29″N
36°15′39″E. The site commands sweeping views over the Orontes Valley
and Ghab Plain below, making it a natural stronghold for controlling
ancient trade and military routes between the Mediterranean coast
(Laodicea/Lattakia) and inland Syria (Apamea).
The castle’s
triangular layout hugs the irregular terrain of the summit. Steep
gorges protect the southern and eastern sides, while the western
approach is more gradual but still requires a steep final climb.
Ruins today cover a sizable area (once about 40 dunums or roughly 4
hectares), with remains of 21 towers, arrow bastions, underground
chambers, water reservoirs, a small church or chapel (about 22 m ×
17 m), and layered fortifications. Construction phases are visible:
early Byzantine elements, 12th-century Crusader work, and later
Islamic (Ayyubid/Mamluk) additions like towers in Arabic style.
Ancient and Early History (Seleucid to Roman Era)
The hill itself
has far older strategic importance than the surviving medieval
structures. In the Seleucid period (3rd–1st centuries BC), it was known
as Lysias and served as a forward post securing the vital overland link
between the coastal city of Laodicea (modern Lattakia) and the inland
military hub of Apamea (Afamia). The location helped protect
communications and monitor the Orontes corridor.
In 65–64 BC, during
Roman general Pompey’s campaign to annex Syria, a Jewish partisan leader
named Silas occupied the site. Pompey dislodged him, bringing the hill
under Roman control as part of the broader conquest of the region.
Byzantine Fortification and Early Islamic Contests (10th–11th
Centuries)
The Byzantines constructed the core of the castle on the
ancient hilltop in the 11th century (with some sources noting possible
earlier 10th-century elements). Inscriptions and historical mentions tie
the fortifications directly to this Byzantine phase.
Control shifted
during the Byzantine–Hamdanid wars:
In 948/949, the commander Abu
al-Hagar held it on behalf of Sayf al-Dawla, the Hamdanid emir of
Aleppo.
In 975, Byzantine Emperor John I Tzimiskes recaptured it from
the Hamdanids during his successful northern Syrian campaigns.
Following the catastrophic Byzantine defeat at the Battle of Manzikert
(1071), Seljuk influence grew. By May 1090, Aq Sunqur al-Hajib, Seljuk
governor of Aleppo, took possession.
Crusader Period (Early 12th
Century)
Crusaders from the Principality of Antioch seized the castle
around 1103—shortly after capturing Antioch in 1098 and Lattakia—during
the reign of Bohemond I (or shortly before Tancred’s operations). They
called it Rochefort (“Rock Fortress”). It became a forward outpost
confronting Muslim-held positions across the Orontes Valley, such as
Qalaat al-Madiq (Apamea) 35 km southeast. Despite its remoteness from
the main coastal Crusader centers, it was surprisingly large and formed
part of Antioch’s eastern defenses.
The surviving ruins largely date
to the 12th century and reflect the first major phase of Crusader
castle-building in the region (roughly 1100–1140), similar in style and
timing to nearby Qalaat Salah al-Din. Crusaders expanded or rebuilt on
the Byzantine foundations, adding the triangular enceinte, multiple
towers, and defensive features adapted to the terrain.
Saladin’s
Siege and Ayyubid Conquest (1188)
Bourzey’s most famous episode came
during Saladin’s (Salah al-Din) whirlwind 1188 campaign after his
decisive victory at Hattin (1187). Having already taken Bakas and
al-Shughur castles, Saladin turned south to Bourzey.
The siege
lasted from 20–23 August 1188:
Saladin encamped along the Orontes and
positioned artillery and assault forces on a nearby plateau.
Bombardment proved largely ineffective against the high, steep walls.
On 23 August, he launched coordinated frontal assaults in three
staggered waves against the western wall. Defenders repulsed the first
but were worn down; Ayyubid troops then scaled the less-defended eastern
slopes.
The garrison retreated to the citadel and surrendered.
The unnamed lord of Bourzey and his family (17 members) were allowed
to leave safely for Antioch. His wife was the sister of Sibylla (third
wife of Bohemond III of Antioch), and contemporary chronicler Ibn
al-Athir claimed she had acted as an informant for Saladin—explaining
the unusually generous terms.
After the fall, the castle passed to
the Ayyubids, who reinforced it with additional towers and Islamic-style
fortifications. It no longer played a major role in ongoing
Crusader–Muslim conflicts, as Saladin’s campaign effectively neutralized
inland strongholds while leaving coastal defenses intact for the time
being.
Later Medieval and Post-Medieval History
The Mamluks
(who succeeded the Ayyubids) further fortified the southern towers. By
the late medieval period, however, the castle gradually lost strategic
relevance and fell into ruins. No major later historical events are
recorded for the site, unlike more famous Syrian fortresses such as Krak
des Chevaliers.
In modern times, Bourzey/Mirza remains a lesser-known
but visually striking ruin, accessible via a short hike from nearby
roads (e.g., microbuses from Jisr al-Shughur toward Jourein). It has not
featured prominently in reports of damage during the Syrian civil war,
unlike some other Crusader-era sites, though the broader region saw
conflict.
Overall Layout and Topographic Integration
The castle's plan
closely follows the irregular contours of its rocky ridge-top site
rather than imposing a rigid geometric form on the terrain. It is most
often described as roughly triangular or trapezoidal, with the western
(longest) façade measuring approximately 175 meters, the eastern
(shortest) base around 50 meters, and an east-west length of about 275
meters. The total enclosed area spans roughly 40 dunums (about 4
hectares).
Natural topography provides the primary defense:
The southern and eastern sides drop off into steep, deep gorges and
valleys, creating near-impregnable natural barriers that required
minimal artificial fortification.
The northern side is similarly
protected by a sloping valley.
The western slope is the least steep
and most accessible (though still requiring a ~100-meter climb from the
end of the approach road), so it received the heaviest artificial
defenses, including concentrated towers and reinforced walls.
The
layout divides into two main zones: an outer/lower bailey (enclosure)
and an inner/upper citadel (concentrated in the northwestern part). This
creates a "castle within a castle" effect, with the inner ward elevated
on rock-cut foundations for added height and defensibility.
Fortifications hug the rocky crest, with walls and towers concentrated
on the vulnerable south and west faces. A central courtyard organizes
the interior space.
Construction Phases and Architectural
Evolution
Bourzey's architecture reflects multi-phase adaptations
from the 10th/11th to 16th centuries, blending Byzantine, Crusader
(Frankish), and Islamic (Ayyubid/Mamluk) styles. A 2002 French-Syrian
archaeological survey (using LIDAR and photogrammetry) documented these
layers.
Byzantine foundations (11th century, with possible
10th-century origins): The earliest surviving structures form a
relatively simple rectangular or irregular enclosure with square corner
towers. Masonry consists of small, irregular local stone blocks set in
mortar—typical Byzantine technique for frontier fortifications. This
phase focused on securing trade routes between Laodicea (Latakia) and
Apamea.
Crusader period (c. 1103–1188): After capture by the
Principality of Antioch (known locally as "Rochefort"), the Franks added
advanced defensive engineering. Key features include rounded towers,
bossed (protruding, rusticated) masonry in towers and walls for better
resistance to projectiles, and strengthened curtain walls. Comparisons
of construction style and technology confirm that much of the visible
core system dates to the early 12th century (1100–1140).
Ayyubid
period (post-1188): After Saladin's three-day siege and capture in 1188,
Ayyubid engineers added or modified towers in Arabic/Islamic style
(often angular or rounded), thickened walls, introduced casemates
(vaulted chambers within walls), and incorporated bent entrances (a
classic Islamic defensive feature forcing attackers to turn and expose
their flanks). These changes addressed vulnerabilities exposed by
Crusader-era artillery and siege tactics.
Mamluk period (13th–16th
centuries): Further reinforcements, especially to southern towers,
layered walls, and surveillance features. The castle was integrated into
broader regional defenses but gradually declined in importance with
shifts in warfare (e.g., gunpowder) and earthquakes (notably 1157 and
1170).
The hybrid style—Byzantine irregular masonry blended with
Crusader bossed stonework and Islamic rounded/angular
towers—distinguishes Bourzey from larger contemporaries like Krak des
Chevaliers.
Defensive Systems
Walls: Thick curtain walls
(constructed in local white limestone, with larger, well-dressed blocks
on exposed western/southern faces and thinner stones on the protected
north). Some sections feature a talus (sloping batter) at the base for
stability and to deflect projectiles. Multiple wall lines exist on the
south face.
Towers: Sources vary slightly (21 towers total in some
accounts; around 12 major watchtowers in others), but they form a dense
defensive ring. Types include:
Square/rectangular (Byzantine
origins).
Rounded (Crusader and Ayyubid additions for better flanking
fire).
Angular or projecting bastions for archers.
External towers
link directly to the outer walls; internal ones protect the upper
citadel. Southern and western towers are largest and most reinforced;
eastern tower 11 serves as a key lookout over the Ghab Plain. Northern
towers are smaller, relying more on terrain. Arrow slits/loopholes and
bastions for archery are prominent.
Entrance: Located on the
western side (the vulnerable approach). It features a bent passage
(modified in the Ayyubid period) between towers—attackers had to turn
right after entering between the first and second towers, exposing them
to enfilading fire. The outer castle has a high arched gateway.
No
moat or outer bailey: Reliance on natural steepness and multi-layered
inner defenses instead.
Internal and Support Features
Small
church/chapel: A modest Crusader-era structure is visible on the surface
(one of the few identifiable non-military buildings).
Water
management: Multiple rock-hewn cisterns and reservoirs (some roofed with
slopes for catchment), located especially between inner and outer walls
on the east side and in the lower inner castle level. Essential for
sustaining a garrison in this arid, elevated location.
Underground
chambers and rock-cut features: Accessible (though hazardous) rock-hewn
rooms, possibly for storage, barracks, or refuge. Foundations often
carved directly into bedrock for stability and extra height.
Living
quarters: Foundations of barracks, administrative areas, and other
structures in the central courtyard and inner ward; most are now ruined.
Materials and Techniques
Predominantly local limestone (white,
quarried on-site) with some basalt elements for durability. Byzantine
phases used smaller irregular blocks in mortar; later phases employed
larger, better-worked ashlars and bossed masonry. Vaulting, arches, and
integrated rock-cutting show adaptive engineering to the site's geology.
Current State and Significance
Today, Bourzey stands as
impressive ruins—remnants of walls, towers, cisterns, and chambers
survive due to the site's remoteness (inaccessible by car; requires
hiking). Earthquakes, abandonment after the Ottoman period, and natural
decay have taken a toll, but the core defensive layout remains legible.
It exemplifies how medieval Syrian fortifications adapted Byzantine
foundations to Crusader and Islamic military needs while leveraging
dramatic topography.
Brief History for Context
The site originated as a Byzantine
fortress in the 11th century (inscriptions link it to that era), built
to secure routes between coastal Latakia and inland Apamea. Crusaders
from the Principality of Antioch seized it around 1103 and called it
“Rochefort.” Saladin captured it after a short siege in 1188 following
the Battle of Hattin; the defenders’ families were allowed safe passage.
Ayyubids and later Mamluks added or reinforced towers and defenses.
Earthquakes and time have left it in ruins, but its remoteness spared it
from heavy stone quarrying.
The triangular/trapezoidal layout
features a long western façade (175 m, the easiest approach) and shorter
eastern side (50 m), protected by steep gorges on the south and east.
There are 21 towers, remains of a small church, arrow slits, two baileys
(upper/inner and lower/outer), rock-cut cisterns, and underground
chambers.
Location & How to Get There (2026 Practical Access)
Coordinates: 35°39′29″N 36°15′39″E (approx.).
Nearest towns: 25 km
from Jisr al-Shughur (Idlib Governorate); about 18 km from Shatah in the
Al-Ghab Plain; northwest of Jurin district (Hama Governorate). It falls
under Latakia Department of Antiquities records despite the
administrative border.
Road access: A (likely unpaved or rough)
road reaches the western slope base. From there, it’s a steep ~100 m
(300 ft) rocky climb up the mountain to the entrance — not technical but
requires good footing and moderate fitness (20–40 minutes depending on
pace). The western side is the only practical approach; the other sides
drop into deep gorges.
Recommended transport (strongly advised):
Private 4x4 with driver/guide from Latakia, Hama, Aleppo, or even
Damascus as part of a custom day-trip or multi-day northwest Syria
itinerary. Public transport is limited and unreliable for this remote
spot.
Pre-war option (still possibly viable): Microbus or shared taxi
from Jisr al-Shughur to a nearby village (e.g., toward Jourein/Shatah
area), then a short walk + the final hike. Confirm current services
locally.
Travel time: A full day trip from Latakia or Hama; longer
from Aleppo or Damascus. Roads in the region can have checkpoints or
rough sections — a local driver familiar with the northwest is
essential.
2026 context: Syria’s tourism scene has reopened
significantly since the political changes. The Idlib/Ghab/northwest area
(former opposition stronghold) is now more accessible, with locals and
some tourists sharing photos and videos of the site online (including
scenic rainbows over the plain after rain). However, it remains off the
standard group-tour circuit, so you’ll likely need a private or
semi-private arrangement through operators like SyrianGuides or similar
reputable firms.
Entry: No formal ticket booth or fees reported —
it’s free ruins. No facilities (toilets, water, shops) on site.
Best Time to Visit
Ideal: Spring (March–May) or autumn
(September–November) — mild temperatures, greener landscape, lower risk
of extreme heat or mud.
Avoid: High summer (June–August: very hot and
exposed) or winter (December–February: possible rain making the climb
slippery and roads muddy).
Early morning or late afternoon for best
light and fewer (if any) other visitors; sunsets over the Ghab Plain are
spectacular.
What to Expect & What to See on Site
Ruins
condition: Mostly rubbly and unrestored — thick limestone walls, towers
(some still standing impressively), rock-cut water tanks/cisterns,
underground chambers, and scattered foundations. The small church and
arrow bastions are identifiable. It feels wild and authentic rather than
manicured.
Highlights: Panoramic views over the Orontes Valley and
Ghab Plain (agricultural fields stretching to the horizon); the sense of
isolation; exploring the western entrance gateway, inner/outer baileys,
and towers.
Underground chambers: Many are accessible but explore at
your own risk — they can be dark, slippery, and prone to cave-ins or
loose stones.
Time needed: 1–2 hours once at the top (plus hike
time). Bring a headlamp/torch for chambers.
Recent visitor vibe
(2026): Photos show peaceful, scenic visits with dramatic light and
wildflowers/grass on the slopes — it’s promoted locally for its views
and history.
Essential Practical Tips
Gear & Preparation:
Sturdy hiking boots or trail shoes (loose rocks, steep/slippery
sections).
Long pants and modest clothing (shoulders and knees
covered — cultural respect in rural Syria).
At least 2 liters of
water per person + snacks/lunch (nothing available on site).
Flashlight/headlamp, sunscreen, hat, sunglasses, light rain jacket,
basic first-aid kit.
Binoculars optional for valley views.
Safety on site: Unstable ruins — watch your step, avoid climbing high or
unstable walls, and be extra cautious in underground areas (possible
collapses). Go with a companion or guide if possible. No guardrails or
signage.
Health & Logistics: Carry cash (Syrian pounds); phone signal
may be patchy. Download offline maps (e.g., Maps.me) with the
coordinates saved.
Cultural etiquette: Greet locals politely if you
encounter any (shepherds, farmers). Photography is generally fine, but
ask before photographing people.
Group size: Best with a small group
or private guide for safety and logistics.
Safety & Travel Advice
for Syria (2026)
While Bourzey itself appears visitable and locals
are sharing positive experiences, Syria as a whole still carries risks
(check your government’s latest travel advisory — many still list parts
as “Do Not Travel” or “High Risk”). The northwest (Idlib area) has seen
major changes but can have variable security, checkpoints, or
infrastructure issues.
Strong recommendation: Travel only with a
reputable, licensed Syrian tour operator or experienced local
guide/driver who knows current road conditions and any required
permissions. Independent travel is possible in safer zones but riskier
for remote sites like this. Travel insurance (with war/terrorism
coverage) is essential. Avoid solo hiking or unverified routes.